Showing posts with label urban decay. Show all posts

Sunday, 21 September 2014

Imperfections

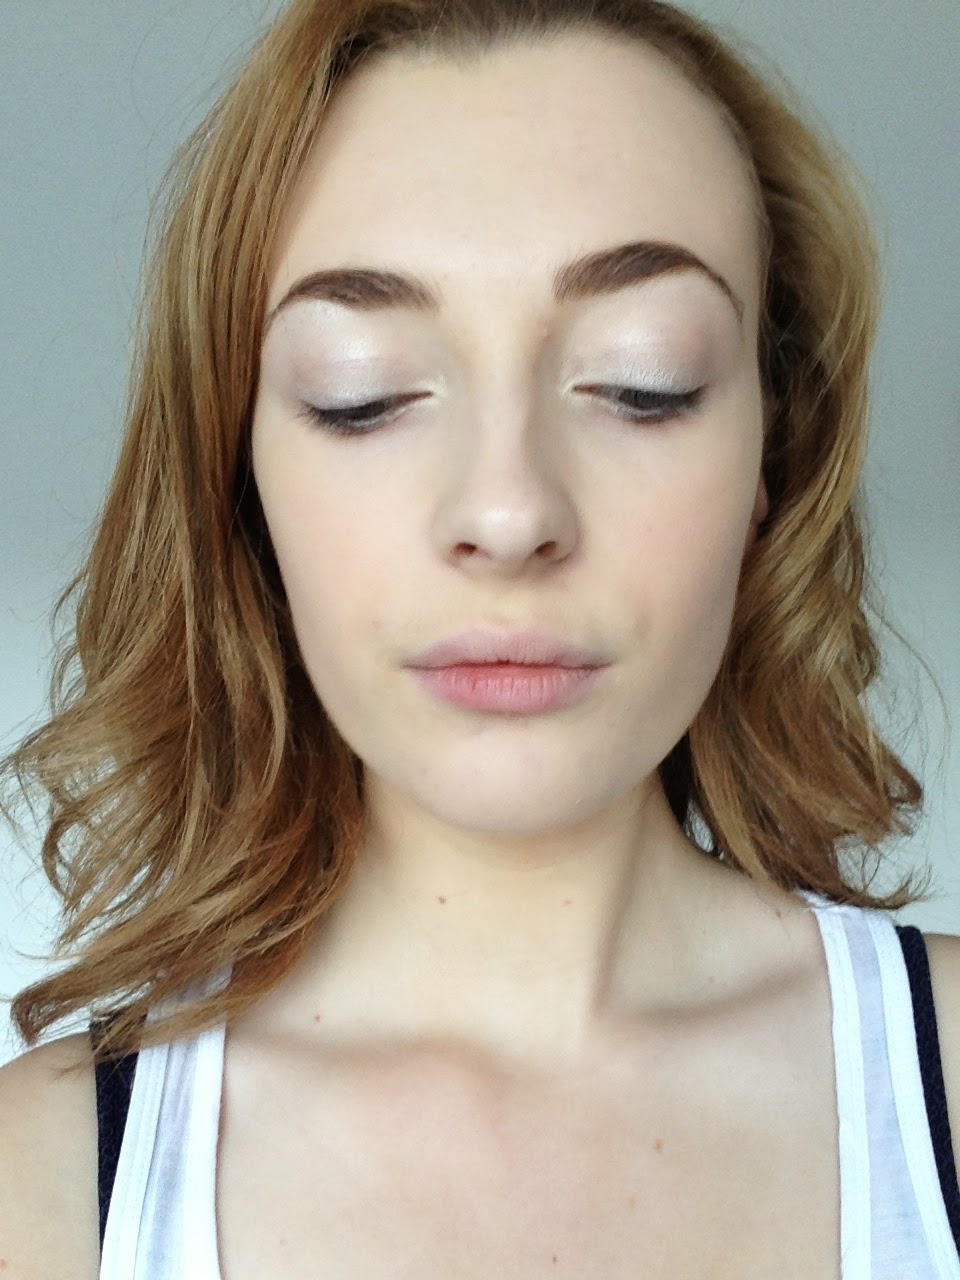
I've recently decided to switch up my make up routine and opt for a simpler, effortless look that revolves around celebrating your imperfections as I've become tired of the polished look that involved hiding all your little glitches to create a perfect base. I've found that finding your defects and basing your make up around them creates a much more interesting look as I was bored with presenting a polished face when a dishevelled one tells a better story.


I blended some tinted moisturiser on with a sponge, used my Benefit Brow Zings to fill in my brows as I like to have strong brows as they frame my face then blended a thin line of bronzed eye shadow towards my lashes and under my bottom lashes. I brushed some mascara on but next time I'm going to use less mascara so it will soften the face and focus more on blending a darker bronzed shadow around the eyes to add warmth.


You can see creased lines under the eyes from where an expression has cropped up, fall out from the eyeshadow under the eyes matches the speckles in my eyes and the kohl mascara coats the lashes adding a hardness to the otherwise gentle look.


For the lips I used a flat sided lip brush to apply a berry stained lip butter, brushing it on then blending with my fingers, smudging the outlines lightly then dabbing more in the centre to create that 'just kissed' effect I think this creates a more youthful approach to lipstick.


Thursday, 4 September 2014

Radiant Daytime Make Up Tutorial

I've created this make up look for a transitional look from Summer into Fall with light neutral smokey eyes and bright pink undertones to highlight the face and create a dewy, radiant face that captures this time of year perfectly.


Don't worry if you don't have the exact products that I'm using just use something similar that you have already!


I've recently been suffering with lots of spots and redness so to combat that I moisturised my face first then used my new MAC Studio Sculpt Foundation which is a high coverage foundation and has SPF 15 great for this time of year when the sun is still out to protect your skin.


I squeeze a small amount onto my beauty blender from Real Techniques then blend onto my face and down my neck, I keep repeating this until I have full coverage of my face, I've found this foundation quite drying so I'd recommend a dewy moisturiser beforehand. 


As I have dark under eye circles I always need to use a high coverage concealer like this Collection Lasting Perfection one but you might prefer a lighter concealer when using a high coverage foundation.


I use my Real Techniques Expert Face brush to blend my concealer.


This has provided me with enough coverage to hide any redness and blemishes but still giving a natural look.


I always use the wax part of Benefits Brow Zings to fill in my brows as I like the colours and how the formula holds my brows in place all day.


I've been growing my brows back out as I guiltily over plucked so I fill them in with a sharp angled brush in short strokes.


I've been setting my brows with a clear brow gel, like the one from Natural Collection.


If I want my eye make up to last all day and night I prime my eye lids with the Nars eyeshadow primer, I'm choosing MAC's 'Nylon' as a highlight for the inner corners of the eyes, on the base and the brow bone as the yellow tones brighten the eyes.


I use a blending shadow brush (e.g. MAC 217) for this then brush it first onto the inner corners then build onto the base of the eye and highlight my brow bone.


Using 'Liar' from Urban Decays Naked 3 palette I blended it in the corners and crease, blending it out to smoke into the 'Nylon' shade I applied just before, this bronze shadow adds some colour and radiance to the face.


Using the shade 'Factory' from the image pictured before I blended this into the corner and slightly into the crease to give some depth to the eyes. 


I used the shade 'Blackheart' pictured above with a sharp angled brush to line the top and bottom eyes and to create a cat eye flick then I blended it out with a shadow brush.


I curled my lashes then applied my Maybelline Falsies mascara on the top and bottom lashes, using a black mascara intensifies the darker eye shadow and highlights the eye colour more.


I then applied a luminous highlighter pen and blended with a flat sided foundation brush to brighten areas of the face.


I used my MAC Mineralise Skin Finish Powder to set the make up with a large powder brush, this powder gives a golden glowy look to the skin.


I then contoured the cheekbones with my Nars Laguna Bronzer which has delicate flecks of shimmer in it to add a natural highlight to the face.


I then added some pink blush to my cheeks using a stippling brush and a shimmery peach nude lipstick to complete the look.


This is a really feminine look that's great for work, during the day and switch the peach lipstick to a raspberry red for night!
The glowing shimmers in these products give you a dewy summer glow, the pink tones lift the face and the smokey cat eye defines your eyes, pretty easy and quick to do this has been my go-to make up look for August.

Let me know any make up tricks you'd like the know how on in the comments!

Wednesday, 23 July 2014

Make Up Tutorial for Hazel Eyes


I decided to do this tutorial to show you which products I have found work best for hazel eyes and which colours on the eyes and lips will make your hazel eyes stand out more. Don't worry if you don't have the exact products that I am using just use something similar or drugstore products that are similar. 


I always prime my face so that my base products will go on smoother and last longer, I'm using the Smashbox Photo Finish Oil Free Primer


I've been using the Laura Mercier Tinted Moisturiser instead of a foundation as it's much lighter on my skin, I blend this in using the Real Techniques Beauty Blender.


I then dab the Collection Lasting Perfection Concealer on my blemishes, around my nose but not under my eyes until all the eye make up is finished.


For my brows I use Benefits Brow Zings in Light but only the wax part I apply this using the sharp angled brush in strokes building my brows up.


I set my brows with Benefit's Gimme Brow by combing it through my brows this also fills in any sparse areas that the wax can't fill. 


I always prime my eyelids as this will make the eyeshadow apply more pigmented and smoother and last a lot longer I use the Nars Eyeshadow Primer as I've found this one works best.


I recently bought this shadow 'Nylon' from Mac I've found it works really well as a highlighter for the brow bone and inner corners as the gold flecks reflect really complimentary with hazel eyes.


I brushed this shadow in the tear ducts, on the first third of my eyelids and on the brow bone this will open up your eyes making them appear brighter.


Using Urban Decays Maui Wowie eyeshadow blend this in the corner and the crease, this shade is a glittery golden olive colour and gold, green colours work really well for hazel eyes as they bring out different speckles in the eyes.


I'm using Mac's 'Sumptuous Olive' blended in the corner and crease as this olive brown will frame the eyes and bring out the brown and golden flecks in hazel eyes adding more depth to the eyes. 


I then blended Urban Decay's 'Smog' in the corner which is a glittery warm brown this adds more depth to the eyes picking up the brown pigments in the eyes.


I used Mac's 'Carbon' on a sharp angled brush to line the eyes on the top and bottom lash line.


As these eyeshadows have all been glitter based I used Urban Decay's 'Oil Slick' which is a glitter based black to go over where I had previously lined my eyes with the matte black.


I used Estee Lauder's Kajal Eyeliner in Black to line my top and bottom waterline this will make the black shadow more intense and the eyes will stand out further against black.


I added mascara to my lashes but only a touch as I decided to add false lashes to this look.


I'm using these Kimberly Eylure Eyelashes to intensify my lashes as they will bring more attention to the eye colour.


I used a make up wipe to remove any fallout from under my eyes then applied the Loreal Lumi Magique Concealer under my eyes and used the beauty blender to blend it in this will highlight the under eyes and bring more attention to the eyes.


I then set the make up using my Mac Mineralise Skin Finish in Natural Light Plus I find that this powder gives a golden glow to the skin and photographs really well.


I then bronzed my face under my cheekbones using the Nars Laguna Bronzer which I love.


I find that using pink features for the face with gold flecks in really bring out hazel eyes and compliment neutral eye make, for the lips I'm using the Revlon Lip Butter in Peach Parfait.


I'm using Sleeks Rose Gold Blush as it is my favourite blusher and compliments my skin tone really well and matches the lip butter perfectly.


The Finished Look!

I love how this make up look has turned out and find that it compliments hazel eyes really well as the eyeshadows each bring out different flecks of colour in the eyes while the rose gold cheeks and lips add a romantic flush. 

What make up tutorial shall I do next let me know in the comments?

Steph x