Thursday 25 September 2014

HOW TO - From No Brow to High Brow!


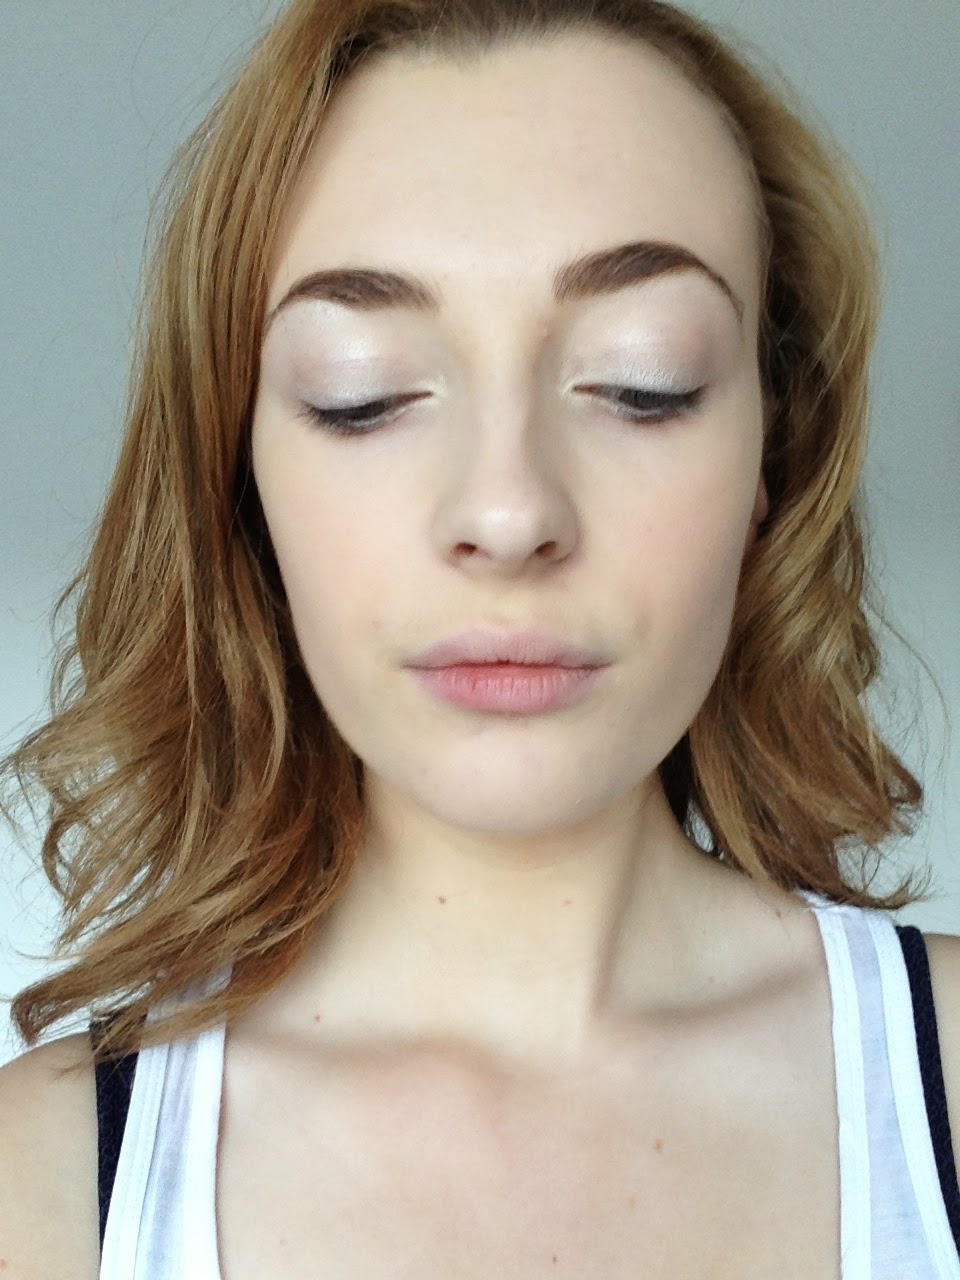
The first in my latest 'How To' posts is one of my most requested tutorials- brows! Having groomed brows adds a veil of sophistication and are a prominent main feature of the face in high fashion reflected by the present day poster girls such as Cara Delevingne, Barbara Palvin, Suki Waterhouse etc. Brows also help to frame your face and bring more attention to your eyes and create the illusion of bringing out your natural contours of your nose and cheekbones.


I first brush my brows in shape using this Topshop Brow Brush.


I find it easier using the bristle side to control them as I have thicker brows.


I use Benefit's Brow Zings in the shade 'Light' which is retailed at £24.50 but you can purchase the Sleek Brow Kit which is a dupe for this one for £8.49 if you're on a budget although the Benefit one is better quality and I've been using it for years as it lasts all day and night and the colour works well for me.


I recently purchased the MAC 266 brush (£16.50) and it has changed my brows for the better! This feathery light brush adds natural strokes to the brows and allows you complete control to create soft curves and sharp angles an investment which is worth it for every brow enthusiast!


I take light strokes in the wax with my brush (I only use the wax part for a more natural look as powder doesn't well with my brows).


I always start by creating the under curve line then fill the brow with diagonal strokes that follow the direction of the hairs.


I then add vertical soft strokes at the front of the brows, do these strokes lightly with not too much product on the brush to add a gradient effect which looks most natural.


I then create the end curve following my brow shape and filling in sparse areas, I like to create a long sharp finishing line at the end of the brow as it looks more polished and compliments the cheekbones.


Now repeat to the other brow and remember your brows don't need to be identical they are meant to be sisters not twins!


Now you wouldn't want all your hard work to go to waste and have your brows loose shape and go wild midday so set them in place with a clear brow gel I'm using the Natural Collection Clear Mascara (£1.99) to shape and hold them in place. Another trick is you can spray some hairspray on one of your fingers then dab it on your brows to really hold them in place this won't harm your brows as long as your use a good make up remover daily to remove the product after.


Now you've got brows to wow!
What brow products do you swear by?
Let me know in the comments!


Sunday 21 September 2014

Imperfections

I've recently decided to switch up my make up routine and opt for a simpler, effortless look that revolves around celebrating your imperfections as I've become tired of the polished look that involved hiding all your little glitches to create a perfect base. I've found that finding your defects and basing your make up around them creates a much more interesting look as I was bored with presenting a polished face when a dishevelled one tells a better story.


I blended some tinted moisturiser on with a sponge, used my Benefit Brow Zings to fill in my brows as I like to have strong brows as they frame my face then blended a thin line of bronzed eye shadow towards my lashes and under my bottom lashes. I brushed some mascara on but next time I'm going to use less mascara so it will soften the face and focus more on blending a darker bronzed shadow around the eyes to add warmth.


You can see creased lines under the eyes from where an expression has cropped up, fall out from the eyeshadow under the eyes matches the speckles in my eyes and the kohl mascara coats the lashes adding a hardness to the otherwise gentle look.


For the lips I used a flat sided lip brush to apply a berry stained lip butter, brushing it on then blending with my fingers, smudging the outlines lightly then dabbing more in the centre to create that 'just kissed' effect I think this creates a more youthful approach to lipstick.


Wednesday 10 September 2014

Room Tour 2014

I have just moved into the new house as I'm starting my second year at university and lived in halls for the first year (which was an experience and a half) now after lots of planning and organisation my new home has finally come together. I'm living with five other students from the uni and the past few days we've been getting used to our new house, decorating it and getting back into the whole independent living trying to remember to lock the doors at night and how to work the microwave etc.

My Room

I haven't completely got my room how I want it to look I'd like to add a armchair next to bed and a bigger rug on the floorspace but after 6 months I'll do an updated room tour this is just the basis of my stuff and a few decorations. 


On this shelf I've displayed my photo frame which was a going away gift last year from a friend with photos of friends, family and my beloved rabbit who passed away sadly. I put up a sarcastic sign that I got a couple years ago which I thought was funny (and true) with my house keys, vintage bell and Thai Lychee candle which smells amazing.


My desk has my make up bag, make up brushes, mirrors, laptop and printer with a notepad and pen, when I'm doing laptop work I tend to do that on my bed but for applying make up I always sit here on mornings and catch up on my favourite youtubers.


This is a stacked shelf (which I'm debating painting white) to the left is some printer paper and a clothes rail that I don't need as I have plenty of wardrobe space so one of my other housemates can have.


On the top I have placed my picnic bag from The Range which I'm using to store my make up that I don't use everyday keeping my essentials in my make up bag on my desk, on the first box I have a chanel bag displayed, embellished clutch and handmade record player bowl (my friend Grace made loads of these and gave them to her friends such an awesome idea). I have also this small white tin which I have displayed my 'Hello There Sailor' sunglasses from River Island and blue reflection sunglasses from & Other Stories I think these look nice but are also handy having them displayed so I can see which sunglasses go with my outfit of the day.


On this second box I have stacked some of my favourite books including The Great Gatsby, The Little Book of Chanel, Dear Scott Dearest Zelda and Shopping for Vintage I have placed my Lake Sunset Yankee Candle to hold them in place. I have also displayed all my nail polishes in this glass jar with industrial style writing that I bought from Matalan for £9 I also keep my most used nail polishes at the top I've been loving the Sally Hansen Diamond Top Coat and Essie's 'Urban Jungle'. I have my camera displayed along with another of those white tins that I picked up from Hobbycraft with my white cat eye sunglasses in them.


For the third box I displayed a cute rose water bottle that reminds me of a day out with my best friend in summer you can read about that here I also have my favourite scent at the minute Victorias Secret Coconut Passion and some ceramic coasters with lovely messages on them that my friends got my for going away to uni. I have displayed Chanel Fine Jewellery, The Perks of Being a Wallflower, Collection of Audrey Hepburn DVD's and Fashion Fact Off game with a rose gold candle.


On this shelf I have my favourite flavoured water, Raspberry & Green Tea, three floral tins with cottons buds, bobbles, grips etc in and a game of Fashion Table Trivia.


This Prada box holds my jewellery in it as I don't ever really wear jewellery I only wear it for special occasions I don't need to have it hung up so this box handily fits it all in. 


On the last shelf I have my books and magazines displayed including a handy manual for all fashion students the Atlas of Fashion Designers and the perfect coffee table book Alexander McQueens Savage Beauty including issues of my favourite magazine Porter. I think getting fashion books for christmas are always my favourite present as they are always so handy for the career I'm choosing and inspirational to look through.


I got my bedding from Asda Home then some textured white pillows to decorate I also put up some fairy lights to make it more cosy and a fluffy white rug which feels like heaven on the feet!


These are my mirrored wardrobes


Thursday 4 September 2014

Radiant Daytime Make Up Tutorial

I've created this make up look for a transitional look from Summer into Fall with light neutral smokey eyes and bright pink undertones to highlight the face and create a dewy, radiant face that captures this time of year perfectly.


Don't worry if you don't have the exact products that I'm using just use something similar that you have already!


I've recently been suffering with lots of spots and redness so to combat that I moisturised my face first then used my new MAC Studio Sculpt Foundation which is a high coverage foundation and has SPF 15 great for this time of year when the sun is still out to protect your skin.


I squeeze a small amount onto my beauty blender from Real Techniques then blend onto my face and down my neck, I keep repeating this until I have full coverage of my face, I've found this foundation quite drying so I'd recommend a dewy moisturiser beforehand. 


As I have dark under eye circles I always need to use a high coverage concealer like this Collection Lasting Perfection one but you might prefer a lighter concealer when using a high coverage foundation.


I use my Real Techniques Expert Face brush to blend my concealer.


This has provided me with enough coverage to hide any redness and blemishes but still giving a natural look.


I always use the wax part of Benefits Brow Zings to fill in my brows as I like the colours and how the formula holds my brows in place all day.


I've been growing my brows back out as I guiltily over plucked so I fill them in with a sharp angled brush in short strokes.


I've been setting my brows with a clear brow gel, like the one from Natural Collection.


If I want my eye make up to last all day and night I prime my eye lids with the Nars eyeshadow primer, I'm choosing MAC's 'Nylon' as a highlight for the inner corners of the eyes, on the base and the brow bone as the yellow tones brighten the eyes.


I use a blending shadow brush (e.g. MAC 217) for this then brush it first onto the inner corners then build onto the base of the eye and highlight my brow bone.


Using 'Liar' from Urban Decays Naked 3 palette I blended it in the corners and crease, blending it out to smoke into the 'Nylon' shade I applied just before, this bronze shadow adds some colour and radiance to the face.


Using the shade 'Factory' from the image pictured before I blended this into the corner and slightly into the crease to give some depth to the eyes. 


I used the shade 'Blackheart' pictured above with a sharp angled brush to line the top and bottom eyes and to create a cat eye flick then I blended it out with a shadow brush.


I curled my lashes then applied my Maybelline Falsies mascara on the top and bottom lashes, using a black mascara intensifies the darker eye shadow and highlights the eye colour more.


I then applied a luminous highlighter pen and blended with a flat sided foundation brush to brighten areas of the face.


I used my MAC Mineralise Skin Finish Powder to set the make up with a large powder brush, this powder gives a golden glowy look to the skin.


I then contoured the cheekbones with my Nars Laguna Bronzer which has delicate flecks of shimmer in it to add a natural highlight to the face.


I then added some pink blush to my cheeks using a stippling brush and a shimmery peach nude lipstick to complete the look.


This is a really feminine look that's great for work, during the day and switch the peach lipstick to a raspberry red for night!
The glowing shimmers in these products give you a dewy summer glow, the pink tones lift the face and the smokey cat eye defines your eyes, pretty easy and quick to do this has been my go-to make up look for August.

Let me know any make up tricks you'd like the know how on in the comments!